Online Security
Strengthening Security with 2-Step Verification
As online attacks continue to become more frequent and sophisticated, safeguarding your accounts is more critical than ever. That’s why we offer 2-Step Verification (2SV) as an extra layer of protection for your online banking.
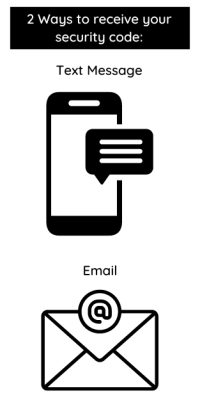
2SV adds a second layer of security to your login process. Instead of answering security questions, you’ll enter a one-time code sent to your registered phone or email. Simply retrieve the code, enter it, and you’re in. Without it, access to your online or mobile banking is denied, keeping your account safer from unauthorized users.
Why enable 2SV?
- Enhanced security
2SV strengthens your login process, helping defend against phishing, cyber-attacks, identity theft, and other forms of fraud. - Convenience
Setup for 2SV is quick and easy. With a mobile device, you can verify of your identity creating a more secure login. - Peace of mind
Of course, one of the most important benefits of enabling 2SV is the confidence you’ll gain, knowing your online accounts have an extra layer of protection.
How to set up 2-Step Verification
You will require an email address or a mobile phone number to set up 2-Step Verification (landline phone numbers will not work). Please make sure you have your email and/or mobile phone close by when completing the set up.
- Login to KCCU Online Banking or the KCCU Mobile Banking App.
- Enter your Branch, Member Number and your Personal Access Code (PAC).
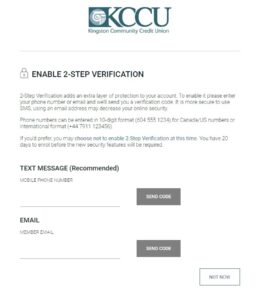
- You will now see the Enable 2-Step Verification screen which will ask you to register either your mobile phone number or email address to receive verification codes.

- Enter your mobile phone number or email and click Send Code.
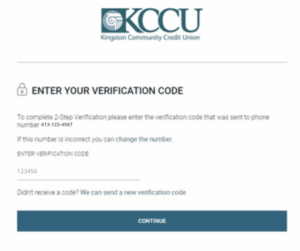
- You will be sent a one-time verification code by email or text, depending on your selection (may take several minutes to receive). This code is valid for 10 minutes. If you selected email, please check your junk mail folder. If you do not receive the verification code, select We can send a new verification code to try again.

- Enter the verification code then click Continue.
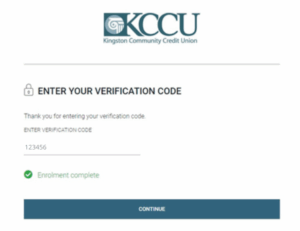
- You will see a green check mark and Enrollment complete.

- Click Continue to enter online banking.
Frequently Asked Questions about 2-Step Verification
No. After 2SV is implemented, challenge questions and answers will be phased out and will no longer be relevant to members login process. The regular login procedure will be Branch, Member Number, PAC, 2SV Code (If required by system).
No. The online banking system will determine when further authentication (2SV) is required. Certain situations where a further authentication might be required are (but not limited to):
- Logging in from a new device (Computer, phone, tablet, etc.)
- Logging in for the first time in a long time (2 months, 3 months, etc.)
No. Unfortunately, the system currently allows for one method of verification code at a time. The system allows the choice of EITHER cell phone number, or email when the user enrolls in 2SV.
No, can only handle one verifiable number.
Not yet. Currently the system will determine when the user needs to authenticate themselves further. However, this feature is something we will be looking into for future implementation.
You have 3 attempts to input the code correctly from what you receive through text/email.
Please call your local KCCU branch and a member service supervisor will be able to unlock you after verifying your identity over the phone as per our regular telephone banking procedures.
Each code generated remains valid for 10 minutes from the time it is generated. If the member inputs the code after that time has elapsed, they will receive an error message.
Please call or come into one of our 3 branches where we will identify you as per our regular procedures and then un-enroll your online access.
Yes! Navigate to the Profile and Preferences page and click on Change 2-Step Verification Information.
Online Banking Alerts
Alerts provide you with an additional layer of security by notifying you via text message or email when there have been certain changes to your online account. You can also set up alerts to help you keep you on track of your finances by being reminded of scheduled payments, investment and loan maturities and even letting you know when your account has a low balance. You set up what you want to be reminded of.
You can set up and edit alerts for almost any scenario through your KCCU Online Banking or the KCCU Mobile Banking App.
Security Alerts
New Payee Added
This alert notifies you when a new bill payment vendor account is added to your KCCU Online Banking or the KCCU Mobile Banking App account.
Personal Access Code (PAC) Changed
This alert notifies you that your online PAC has been changed.
Online Banking Account Locked Out
Incorrect PAC – This alert notifies you that access to KCCU Online Banking or the KCCU Mobile Banking App has been locked because the number of attempts to sign in exceeded the number allowed.
Online Banking Account Locked Out
Incorrect response to Security Question – This alert notifies you that access to KCCU Online Banking or the KCCU Mobile Banking App has been locked because someone has entered an incorrect answer to the security question exceeding the maximum.
Online Login
This alert notifies you anytime a login has occurred.
INTERAC® e-Transfer recipient added
This alert notifies you when a new Interac e-Transfer recipient has been added.
INTERAC® e-Transfer online payment authorized.
Balance and Activity Alerts
- My Balance
- Low Balance
- Deposit
- Withdrawal
Payment Alerts
- Insufficient funds
- Scheduled payment or Transfer May Fail
- Scheduled Payment Failed
- Scheduled Transfer Failed
Investment Alerts
- Term Deposit Maturing
- Loan or Mortgage Payment Due
- Loan or Mortgage Maturing
- Safety Deposit Box Renewal
How to set up Alerts
- Log into KCCU Online Banking on a trusted computer.
- Select Messages and Alerts from the left-hand navigation bar.
- Select Manage Alerts.
- To set up the method you receive the alerts, Select Manage Alerts Contacts.
- Select Add Email or Add Mobile Phone.
- Review the Alerts Agreement and click I accept.
- Enter the email address you would like alerts sent to.
OR
Enter the phone number you would like alerts sent to, and the phone carrier.
- Click Continue.
- Select Messages and Alerts from the left-hand navigation bar.
- Select Manage Alerts.
- Select Add a New Alert.
- From the selection of alert types, choose the alert you would like to set up.
- In the right-hand corner of the alert type, select Add.
- Check the box of the method you would like to receive this alert, either by email or by text.
- Click Submit.
- Follow steps 9-15 if you would like to set up additional alerts.
Questions and Answers
In addition to receiving your alerts via e-mail or text, you can also review the last 30 days of Alert History.
- Log into KCCU online banking on a trusted computer.
- Select Messages and Alerts from the left-hand navigation bar.
- Select Manage Alerts.
- Select View Alerts History.
Mobile alerts will be sent soon after the activity takes place in your account. Delivery of the alerts will vary depending on your carrier.
Sign into KCCU Internet Banking and edit your Alerts Contact Information to include your new mobile number or e-mail.
Note: Each time a contact is added or modified you must Edit all of the active alerts and check the appropriate contact box. If the box is not checked, the new contact will not receive an e-mail or text alert.
Contact your service provider to suspend your service. Contact your credit union if you have any concerns about the security of your account.
If you are a Rogers or Fido customer, you may be asked to subscribe to an email-to-text service to avoid having to text ‘read’ each time you want to view your Alerts on your mobile phone. There may be a fee for this service, so please contact your carrier for more details on their email-to-text plans.
- Log into KCCU online banking on a trusted computer.
- Select Messages and Alerts from the left-hand navigation bar.
- Select Manage Alerts.
- A list of your Active Alerts will be displayed.
- Locate the alert you would like to stop receiving.
- Select the three dots in the top right-hand corner of the alert.
- Select Delete.
- Repeat steps 5-7 for each alert you would like to stop receiving.


